Showing posts with label unusual materials. Show all posts

COLLABORATIVE ART WITH BELINDA DWORAK - Part 1


Hi everyone;

Here's another fun collaborative project I was involved in, this time with the lovely Belinda Dworak.

Belinda sent me a small piece she had started on canvasboard.  It's 6" X 8."  Here's what it looked like when it arrived.  She'd used some beautiful butterfly images on sheet music to start the piece.


My first step was to take some pink acrylic paint and do some mark making on the piece, using the edge of an old credit card.  I love this effect!


Next, I added some neon yellow acrylic paint with a sea sponge, some neon green paint using a rubber stamp sheet (crackle pattern), followed by some neon pink with the sea sponge again.


After that, I used some cheap, Dollar Store number stamps with purple acrylic paint and a bit of doodling around each number.  On the right lower side of the piece, I collaged a bit of a border (Teesha Moore image), along with one of my gelli print images (the flower face) in the upper right.


Next, I added another of Teesha's collage elements (pink flower in lower right) and did some doodling around my gelli flower face.  I made the central image from assorted bits and pieces (gelli print scraps, recycled office supplies and some collage elements I had scanned from previous art I had made).  Then more doodly outlining.


My next step was to collage on to the piece the upside down number border at the top of the piece.  I also added the joker image (a scan from a playing card that I aged with a bit of walnut ink) and the alphabet text in the lower right.


I added another of my gelli print flower faces to the left side of the piece, over another collage element courtesy of Teesha Moore and more of my gelli scraps.  More doodling followed.  The pink flower in the lower right got a visitor about then too.


Next, the joker got some color added (Pitt Pen brush markers) and I did some doodling in the background of the lower left with gel pens.  I created some 3D flowers in the lower left using handmade polymer clay beads for the flowers and miniature checkerboard paper for the stems.  Our central image got a crown.  Red stamp ink around the edges of the piece give it a finished look and I called it done at this point, feeling that it had become busy enough.


I really had so much fun with this piece.  It took me a while to get going on it but once I was on a roll, it came together quite quickly.

Join me again next week when I will feature one of the pieces that Belinda transformed into something very special.

Have a great week, one and all!

Hugs!
Joanna

Any Flat Surface Will Do - Collage On Anything!

Art Magnet Made With Recycled Laminate Sample

There's a running joke in our household that if something is flat and not nailed down it will probably end up in one of my collages.  

As the "Queen of Recycling" (a title given me by friends and customers), I always look at recyclable materials with a view to whether or not they'd make a good substrate for my art. 

Case in point, about 12 years ago I was in the home improvement store looking at those little laminate sample chips you can pick up when you are thinking of replacing your kitchen countertop.  They come in a myriad of colors and textures and are strong and durable.  They have rounded corners typically and a hole punched in them, and are about 1.5" X 2" or so.  Initially, I used them to make art jewelry pendants which I sold on Ebay and Etsy for several years.  

Eventually, I found some larger pieces that were about 3.5" X 5" and started making larger art magnets with them.  I hadn't made any in quite some time, when I recently came across a stash of them in my studio and decided to play around with them again.  I had been wanting to use up some of my Gelli plate prints that I have amassed, so I thought I'd make some fun and funky art magnets.  Here's what I did:

Here's a couple photos of the fronts and backs of the laminate pieces.  I have chosen to do the art on the back (unfinished) side because it has a more grippy surface than the slick "good" side of the laminate.  Plus, that way the finished piece will have a really nice look to the back side as well as the front.  

Laminate Samples - Front

Laminate Samples - Back

I cut my Gelli plate prints a bit bigger than the size of the laminate sample, which is about 3.5" X 5."  I chose some of the brighter, more colorful prints I have because I was planning on making these collages into some of my smart-ass magnets and I wanted them to be fun and playful.  

To ensure good adhesion, I used heavy body gel medium (Golden) to glue the prints to the backside of the laminate and let them dry.  Then I trimmed around the edges of the laminate to remove the excess paper.

Collaged elements, doodling, lettering, and other paint treatments came next.  I ran a stamp pad around the edges of the piece to finish the magnets off and then sprayed each with three coats of high gloss sealant.  Two flat, sheet magnets (the kind used for business card magnets) were put on the back of each piece.

Back Of Lamnate With Two Magnets Attached

Art Magnet Made With Recycled Laminate Sample

Art Magnet Made With Recycled Laminate Sample
This was a fun and quick project with great results.  It has reminded me that I should re-visit my previous types of work from time to time, bringing with me the latest techniques and tools I am using.  It brings new life and a new spin to the tried and true.

Thanks for visiting and have an artful day!

Much love always!
Joanna


Where Did You Get That Avatar Of Yours???

I am often asked about my Facebook and blog avatar.  You know, the little face with sunglasses that reads "odd things in my mind."

Well, here's the answer to that question.

The image comes from a mixed media collage/assemblage I created in 2007.  I used an old bingo card, a variety of stamped images, walnut ink and a vintage escutcheon image (courtesy of Retro Cafe Art) for the main body of the piece.  Recycled wire and salvaged beads create the hanger and I used old wallpaper to print the sentiment onto, which reads "She Had Not Yet Decided Whether To Use Her Power For Good Or Evil."

So there you have it.  One of the great mysteries of the world has been solved!  ;-)


Simple Collage Art Project "How To"

"The Quieter You Become, The More You Can Hear"  (Lao Tzu)


Here's a really simple collage/mixed media art piece that will demonstrate for you beginners out there how very easy it is to create a beautiful collage with minimal materials and minimal cost.  There is absolutely NOTHING new used in this piece of art!

I started with a piece of heavy chipboard that was part of the packaging of some appliance.  It is a nice, sturdy piece and measures about 5" X 7" so the minute I saw it I knew it would make a good base for a small collage.

I covered it in a piece of scrap wallpaper.  If you don't already know this, wallpaper is an excellent material for collage and mixed media art.  It is very strong and can be used for a number of artsy applications.  I often use it for backgrounds for my art.  And it's free!  You can go to your paint store and get the sample wallpaper books for free.  They usually throw them out.  Don't pay for the books, just go somewhere else if they want to charge you for them.  You'll have a great collection of all kinds of printed backgrounds to use in many, many ways.

To cover the chipboard with the wallpaper, I cut the paper larger than the chipboard allowing about an inch extra all the way around.  I will usually use white glue (Aleene's is my favourite), spread evenly on the chipboard and wrap the wallpaper around the chipboard, mitering the corners of the paper for a nicely finished edge.  Burnishing or running a brayer over the front side, helps to ensure a smooth surface to work on later.  Turning the piece over, I used more white glue to adhere the excess paper around the edges to the back of the piece.  (See photo below of the back of the piece.)


When it's all dry, I am ready to start my collage on the front.  I had found a wonderful Buddha image in a discarded National Geographic magazine and knew I wanted it to the be the focal image in a collage.  Because of how it was shaped (see photo), I aligned it to the lower right.  I will typically work with images this way.  Whichever way they come to me, I work with that.  If they must be left aligned to look correct in the context of the collage, then that is how they get placed on the background.  If the bottom of the image is missing for some reason, then it will probably get aligned to the bottom of the page.  I never "fight" how the image is, I just work with it.  In this case, the image was a 90-degree angle (bottom and right aligned) so that determined where it would be placed.

With Buddha aligned to the bottom right, the logical place for the next image was the upper left, for balance and symmetry in the piece. Given that this was now going to have to be a Zen themed piece, I tried to keep in mind one of the main principles of Zen and that is simplicity.  I knew I was not going to add a whole lot of elements to this piece so whatever elements DID make it into it, they had to have enough presence to hold their own.  I used the stamped image of the sun/moon face on Gelli plate printed paper and it was a nice complement to the Buddha.  I deliberately chose the bright pink paper for the face so that it would juxtapose with the muted purply tones of the Buddha image, yet still work together overall because the colors are complementary to one another (and to the background as well).

At this point, I knew that there wasn't too much else to be added to the piece for it to be done.  When you are at this stage in developing a piece, it's good to step back and look at it with a critical eye.  Where are the blank spaces that cry out to be filled?  What more needs to be done?  What areas need to be left alone?  Play around with placement of your elements until it feels right.

The bamboo bits are stamped images on scrap paper, again kept to a minimum and the text was cut from a photocopy of one of my previous collage pieces from years ago.  I will often recycle text or quotes over the years.  There is no reason on earth to have to reinvent the wheel every time you set out to make some art.  In this case, I knew the quote would be perfect so why not use it again.

And that is the whole piece.  A couple of coats of matte sealant and it is ready to go.  I will cover the back with another piece of recycled wallpaper so that it has a finished look.  That way, it won't matter if this piece is framed or if it is displayed on a small easel.  Either way it will look great!


I hope this lesson has shown you that you can get some great effects with a minimal amount of work and with low-to-no cost supplies.  Start looking around and see what you can make art with.  I'll bet you'll be surprised at how much you CAN do!

Have fun in your artsy adventures, my friends.

Joanna

Happy St. Patrick's Day!

Top o' the mornin' to ye!  Here's some green art, current and past, which I hope you'll enjoy.

Mixed Media Art On Canvas


"Nature Goddess" Bookmark


"Art On The Brain" Bookmark


"Moonscape" Greeting Card


Art Journal Page


Art Journal Page


Mixed Media Art


Mixed Media Art


"How Old Would You Be If You Didn't Know How Old You Are?" Greeting Card

Using Humor In Art

A close second to my love of using inspirational quotes in my art work is the use of humor.  I have created a huge amount of mixed media, collage and altered art that has sarcastic and irreverent humor as its base.  It just is SO me, what can I say.

When I first started using humor in my art (in my two lines of funny magnet art), I was a little worried.  I wasn't sure anyone else had the same sense of humor that I did.  As it turned out, I had nothing to worry about at all.  Everyone loved the magnets (and greeting cards which came next) and I still sell them to this day at my art shows.  I'll do a post about some of them another time.  In the meantime, a number of other people have had great success with this type of humor, often paired with vintage images as I did.  If you've seen Anne Taintor's stuff, you'll know what mine is like.

Following are some examples of some other art pieces I created using recycled drink coasters as the substrate, along with salvaged papers, vintage images, discarded embellishments and scrap ribbon for hangers.

Hope you have a laugh!

Joanna


More Funky Collage & Altered Art Stuff

Sharing some fun and unique pieces I have made:

The first is an altered art doll made using a recycled oversized tag for her body, salvaged jewelry bits for her arms and legs, a clay cabochon for her face and repurposed floral pieces.

"Seek Serenity" Altered Tag Art Doll

"Time Is Eternity Living Dangerously"  Mixed media/collage made with recycled wallpaper, salvaged watch parts and discarded jewelry pieces.

"Time Is Eternity Living Dangerously"  Mixed Media Collage


"The Height Of Your Accomplishments Will Equal The Depth Of Your Convictions"  Mixed media collage with recycled materials.


"You Are Always In The Right Place At The Right Time" mixed media collage with recycled materials.


Abandoned Art - "Reve Du Papillon"


I am probably taking this "Art Abandonment" thing too far, but I'm having so much fun with it, it's hard to stop.  If you don't know what that is, check out the Art Abandonment group on Facebook or Google "Art Abandonment" or "Free Art Fridays."  There are a number of movements out there where artists are leaving pieces of art in public places for people to find and enjoy.  I've actually been doing this for at least five years already, but it's becoming very popular now, in large part due to the Facebook group's founders and members.

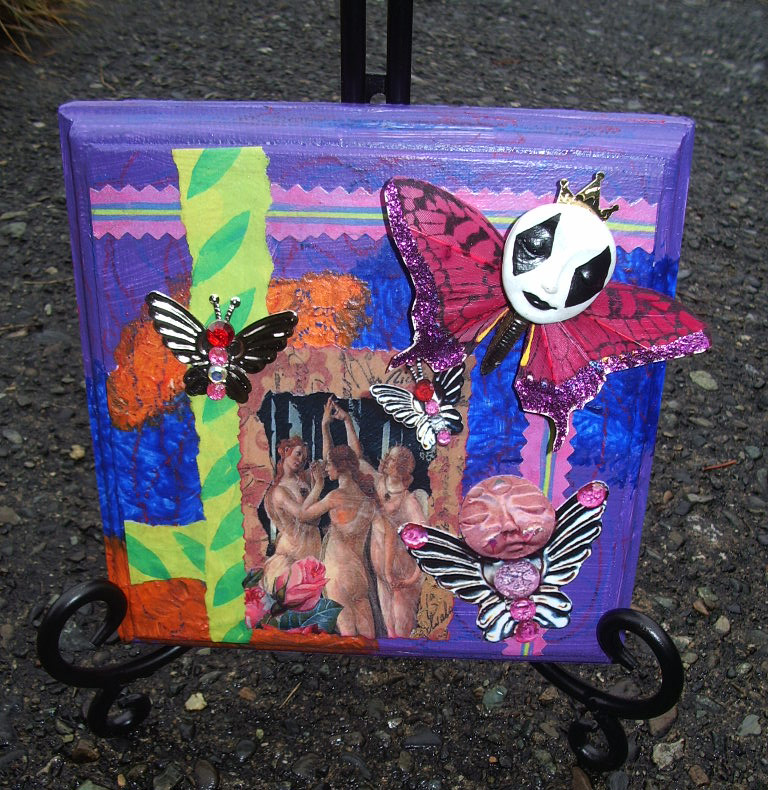
"Reve Du Papillon" will soon be among those pieces abandoned.  This is a mixed media assemblage piece made almost completely of recycled materials.  The substrate is a piece of bevelled wood I salvaged from the junk pile at a woodworking shop.  Various paints, inks and other treatments form the background, along with a vintage image and various repurposed embellishments (including a salvaged butterfly and harlequin face cabochon which give the piece a 3D look).  It sits on a faux wrought iron stand.

I am not sure where I will abandon this piece but it will be somewhere in the Okanagan Valley during the month of February.

Perhaps you'll find it???


"The Only Gift ..." Original Art In My Etsy Shop


I often forget that I should be using this blog to promote what I am selling in my Etsy shop.  Duh!

So, here's a piece that is a combination of mixed media, collage and zentangle-inspired work.

The quote is, "The Only Gift Is A Portion Of Thyself."  Unfortunately I can't remember whose quote it is.


It is about 5" X 8" in dimension and was made using salvaged cardstock for the substrate, assorted recycled papers, inks, stamped images, zentangle doodling and various images.

The link to the listing on Etsy is here.

Thanks for looking!

Joanna