Showing posts with label miniature art. Show all posts

GELLI PRINT ART TAGS with Phyllis Terrell

Gelli Printed Art Tags By Phyllis Terrell


One of the great things about teaching online and having an online presence through this blog, Facebook and other sites, is the opportunity to connect with like-minded souls.  I so enjoy that!!

Case in point, my recent online workshop "Gelli Jam" with Artful Gathering Online Art Retreat in the summer of 2014.  I met such wonderful people through this event, including the lovely Phyllis Terrell.  One of the projects Phyllis and the other students took part in was making a mini art journal with gelli printed shipping tags.  

The image above is a scan of just a handful of the tags that Phyllis so generously sent to me for me to use in my own mixed media art.

Below are a couple examples of what I did with Phyllis' tags.  You all know how I love to create little characters with bits of pieces of this and that.  This practice of creating little "people" lends itself well to tag art.  It's also an opportunity for me to use up other scrap bits and recycled elements including those funky fibers that adorn the tags.

The very last tag uses some recycled scrapbooking stickers that someone was going to throw out.  They are metallic silver and really pop against Phyllis' awesome tag.  I'm going to send her this one as a thank you for her generous gift.

Hope you are having an awesome, artful day, my friends.

Cheers!
Joanna


GELLI PRINT PACKING TAPE ART MAGNETS - HOW TO


Art Magnets Made With Gelli Tape Transfer Technique


Hi friends;

Here's a long overdue post for you on how I make those art magnets, using my gelli prints on packing tape.

If you haven't see the Gelli Arts video on how to make cool, arty packing tape with gelli prints, then go here first to see what I am talking about:

Gelli Arts Packing Tape Video

So, here are some photos of two of my Gelli plates with acrylic and dimensional paints.
 
12 X 14 Gelli Plate With Acrylic & Dimensional Paints

6 X 6 Gelli Plate With Acrylic Paints

And here is the tape I made from those two plates:

Gelli Tape - No Glitter Or Pearl Ex Powder Used Yet

Gelli Tape With Teal And Purple Glitter Added To Fill In The Sticky Areas

The tape was just about the perfect width for me to make backgrounds for my art magnets I create so often.  I use those sticky-backed business card-sized magnets you can buy at the office supply store.  They are 2" X 3.5" and are great for making small-scale art magnets.

Sticky-backed business card magnet blanks

All I had to do was peel off the white paper from the magnet, put the gelli tape on the magnet (remember, it's VERY sticky) and then trim the edges.


So now I have the backgrounds of the art magnets ready, what am I going to put on top of the Gelli tape?

I started by adding some of my doodly flower collage elements.  And then I added even more doodling on them with my Sakura Moonlight Gelly Roll pens (this step not shown).


Next, from my ever-increasing stash of stuff, I pulled some cute vintage-style graphics that measure about 1" X 2" and which I had already put under those sticky-backed resin pieces you can buy for such purposes.  They are great to use for making pendants and domino art.  I believe these images came from Lisa's Altered Art.

Resin Blanks (left) and Vintage Images Under Resin (right)

I used some E-6000 (similar to GOOP) to adhere the vintage images that were now under resin to the magnet backgrounds.  Clothes pins held them in place until they dried.

And here are the finished pieces.  The scans really don't do them justice as they are very bright and shiny because of the packing tape and the resin.


If you go back to the top of this post, you'll see a couple of examples of another style of magnet I made using some sweet vintage images of ladies and their dogs, and with this same technique.

I hope you've enjoyed this little tutorial and I'd love to see what you create with your gelli packing tape.

Until next time ...

Joanna


MIXED MEDIA ART MAGNETS - back to where it all began

Hello everyone;

Many, many moons ago (about 15 years), as some of you will know, I started on my artful adventure in mixed media by making little collages on magnets with recycled and salvaged materials.  I had been given a whole bunch of business card blanks (sturdy cardstock that measured 2" X 3.5") and decided to experiment in collage with them.  Their small size meant the process wasn't too intimidating and it was really easy to get work finished quickly.

At about the same time, I found out that you could get sticky backed magnets the exact same size and that lots of people used these magnets to turn their business cards into a marketing tool for themselves.  The light bulb went on and I still use these sticky-backed magnets to make miniature works of art to this day.

I am now, all these years later, a self-confession Gelli plate printing addict.  I use my gelli monoprints in all kinds of mixed media and collage pieces and always have interesting little bits left over, which lend themselves very well to becoming magnets.

The following are images of my most recent creations using scraps of Gelli prints along with collage elements.  I have deliberately chosen to keep the compositions simple so that the beautiful, one-of-a-kind backgrounds can shine.  You can't see it in the scans, but many of the magnets have also been treated to a little dash of glitter for a bit of sparkle.

I hope you like them.  A few are already sold but some of these are still available if you are interested.

Cheers, my friends!
Joanna


FREE Vintage Halloween Images On My Facebook Art Page


If you're looking to make some fun Halloween themed art, you might want to check out my Facebook art page, where I have posted a bunch of vintage images that are so fun to use.

Here's the link:

Free Vintage Halloween Images

As always, if you use these images in something you sell, I would appreciate it if you cite your source (these come from my own collection).  And I love, love, love to see your work.

Take care, my friends.

Joanna

My Art Friends Do Such COOL Things !!!

Recently, I posted some of my Gelli Plate printed backgrounds for my blog followers to download for free to use in their own art.  I always encourage my friends and followers to share with me the awesome creations they come up with using my downloads.  I just LOVE to see what others can do with stuff I have made.  It feels like we have collaborated on art even though we may be thousands of miles apart and may never have met in person. 

Anyway, this past week two of my favourite people contacted me to share what they'd done with those backgrounds.  If you missed the posts of those backgrounds they are here:

Free Backgrounds To Download

More Free Backgrounds To Download

First up, my friend Gayle Bodine took prints of the backgrounds and cut them up to use in her own art journaling.  What she discovered with the little squares she'd cut from the larger prints is incredible!  Take a look at her blog here to see the fantastic examples she has shared:

Gayle Bodine's Blog Post

Gayle Bodine "Found Impressionist Landscapes"


Secondly, my artsy friend Kay Strum took those same backgrounds and printed them off to use in her handmade greeting cards and ATCs.  You are in for a real treat when you take a look at the next few images.  Wouldn't you just LOVE to receive a one-of-a-kind card like these?  Kay has a real gift for cardmaking!

Kay Strum Original Greeting Card

Kay Strum Original Greeting Card

Kay Strum Original Greeting Card

Kay Strum Original Greeting Card

Kay Strum Artist Trading Card


Well, if these don't inspire you, I don't know what will!  Be sure to download those backgrounds yourself if you think you could put them to use in your own art.  And, as always, let me know what you create so I can feature your work here too!

All the best always, my friends.
Joanna

New Art In The "Gelli Kids" Series

SOLD!  Thank you, Barb!!!


That should read $69.95US for BOTH pieces, and with free shipping to the U.S. and Canada.  The quote is a favourite from Robin Williams.


Gelli Kids Art Magnets "How To"

I've had some magnet blanks sitting around for several months now, taking up space on my work table.  I see them every time I sit down and each time I think, "geez, I really should think of something to do with them and free up this space for something new."  Then, as usual, I procrastinate and another day, then a week or more goes by before I get tired of them again.

FINALLY this past week I got around to doing something with them and now they are all done and can find a home in my Etsy store and hopefully, ultimately, a new home with someone who'll treasure them.

I've been doing a series I call my "Gelli Kids" which are a bunch of cute little characters that I make with my Gelli plate printed papers and who are featured on Gelli plate pages in my art journal or on small canvases.  It's been a bit of a challenge I gave myself to see how many different Gelli plate printed pages I could use in a single application.  In some cases, four or five different types of prints have been used, which has been so much fun to do and which has resulted in some pretty cool effects.  This project is no different.

I started off with a couple of cardstock circles that I had made in my very first Gelli prints a few months ago. For the purposes of these magnets, it is the bottom circle I am talking about from the photo below.  I actually made two prints quite similar.


This circle of cardstock was about 5" in diameter and I was able to get two pieces from each circle for a magnet blank.  Each magnet is 2.5" X 3.5" the size of a standard business card.  Here are the four I got from using the two circles of cardstock.  They have been mounted to the magnets (which are sticky with a peel away cover).  I also coated them with a shimmery, glittery clear glue which doesn't show up well in the photos.


And there they sat for a couple of months until inspiration hit.

I was putting together a bunch of smaller-scale Gelli Kids and the lightbulb went on that I could use these magnet blanks and create some miniature art that would be almost entirely made with my Gelli prints.  I just cut out simple shapes for the top and bottoms of the characters and doodled on some and stamped words in places. The faces used are copies from some of my other collage art.  They had all originally been polymer clay face cabochons in much larger art .  I added teeny flowers (punched) with  zetti-style black and white stems and tiny faux gemstones at the center.    A couple of coats of sealant and they are ready to go!


I am very pleased with how they turn out.  The colors are bold and brilliant and the glittery background makes them so fun!  I could sit around all day making these, I think.  Hope you like them too!

Cheers!
Joanna

Simple Collage Art Project "How To"

"The Quieter You Become, The More You Can Hear"  (Lao Tzu)


Here's a really simple collage/mixed media art piece that will demonstrate for you beginners out there how very easy it is to create a beautiful collage with minimal materials and minimal cost.  There is absolutely NOTHING new used in this piece of art!

I started with a piece of heavy chipboard that was part of the packaging of some appliance.  It is a nice, sturdy piece and measures about 5" X 7" so the minute I saw it I knew it would make a good base for a small collage.

I covered it in a piece of scrap wallpaper.  If you don't already know this, wallpaper is an excellent material for collage and mixed media art.  It is very strong and can be used for a number of artsy applications.  I often use it for backgrounds for my art.  And it's free!  You can go to your paint store and get the sample wallpaper books for free.  They usually throw them out.  Don't pay for the books, just go somewhere else if they want to charge you for them.  You'll have a great collection of all kinds of printed backgrounds to use in many, many ways.

To cover the chipboard with the wallpaper, I cut the paper larger than the chipboard allowing about an inch extra all the way around.  I will usually use white glue (Aleene's is my favourite), spread evenly on the chipboard and wrap the wallpaper around the chipboard, mitering the corners of the paper for a nicely finished edge.  Burnishing or running a brayer over the front side, helps to ensure a smooth surface to work on later.  Turning the piece over, I used more white glue to adhere the excess paper around the edges to the back of the piece.  (See photo below of the back of the piece.)


When it's all dry, I am ready to start my collage on the front.  I had found a wonderful Buddha image in a discarded National Geographic magazine and knew I wanted it to the be the focal image in a collage.  Because of how it was shaped (see photo), I aligned it to the lower right.  I will typically work with images this way.  Whichever way they come to me, I work with that.  If they must be left aligned to look correct in the context of the collage, then that is how they get placed on the background.  If the bottom of the image is missing for some reason, then it will probably get aligned to the bottom of the page.  I never "fight" how the image is, I just work with it.  In this case, the image was a 90-degree angle (bottom and right aligned) so that determined where it would be placed.

With Buddha aligned to the bottom right, the logical place for the next image was the upper left, for balance and symmetry in the piece. Given that this was now going to have to be a Zen themed piece, I tried to keep in mind one of the main principles of Zen and that is simplicity.  I knew I was not going to add a whole lot of elements to this piece so whatever elements DID make it into it, they had to have enough presence to hold their own.  I used the stamped image of the sun/moon face on Gelli plate printed paper and it was a nice complement to the Buddha.  I deliberately chose the bright pink paper for the face so that it would juxtapose with the muted purply tones of the Buddha image, yet still work together overall because the colors are complementary to one another (and to the background as well).

At this point, I knew that there wasn't too much else to be added to the piece for it to be done.  When you are at this stage in developing a piece, it's good to step back and look at it with a critical eye.  Where are the blank spaces that cry out to be filled?  What more needs to be done?  What areas need to be left alone?  Play around with placement of your elements until it feels right.

The bamboo bits are stamped images on scrap paper, again kept to a minimum and the text was cut from a photocopy of one of my previous collage pieces from years ago.  I will often recycle text or quotes over the years.  There is no reason on earth to have to reinvent the wheel every time you set out to make some art.  In this case, I knew the quote would be perfect so why not use it again.

And that is the whole piece.  A couple of coats of matte sealant and it is ready to go.  I will cover the back with another piece of recycled wallpaper so that it has a finished look.  That way, it won't matter if this piece is framed or if it is displayed on a small easel.  Either way it will look great!


I hope this lesson has shown you that you can get some great effects with a minimal amount of work and with low-to-no cost supplies.  Start looking around and see what you can make art with.  I'll bet you'll be surprised at how much you CAN do!

Have fun in your artsy adventures, my friends.

Joanna

More Abandoned Art Magnets


Hello!  I can't believe it's April already!  Woo hoo, summer is on its way!

I'm really getting carried away with this Art Abandonment thing.  Although I have been abandoning art for several years now, I have really gotten into it lately since I have been involved with my online group.  This month, I will continue to abandon more of my art magnets in my own and other communities as I travel.

These are miniature prints of my original art and each one measures 2" X 3.5" (see quarter in the photo for scale).

As I mentioned in my January post to our Art Abandonment Group (Facebook), magnets are great for abandoned art because they are easy to adhere to different surfaces that you might not otherwise consider as a suitable location for your art.  I have abandoned magnets on door frames, utility boxes (those big ones in public places that house city electrical connections or water shutoffs, etc.), playground equipment, the doors in public restroom stalls (inside, of course).  I try to make it a challenge for myself to find really out-of-the-way places to abandon magnet art.  It is SO fun to think how long it might be before someone discovers it and if only to be a "fly on the wall" to see the wonder on their faces when they find it.

I STILL love art by stealth!!

Cheers!
Joanna


March Magnet Madness - Abandoned Art


For the month of March, I will continue to abandon more of my art magnets in my own and other communities.

These are miniature prints from my original art and each one measures 2" X 3.5" (see quarter in the photo for scale).

As I mentioned in my January post to our Art Abandonment Group (Facebook), magnets are great for abandoned art because they are easy to adhere to different surfaces that you might not otherwise consider as a suitable location for your art.  I have abandoned magnets on door frames, utility boxes (those big ones in public places that house city electrical connections or water shutoffs, etc.), playground equipment, the doors in public restroom stalls (inside, of course).  I try to make it a challenge for myself to find really out-of-the-way places to abandon magnet art.  It is SO fun to think how long it might be before someone discovers it and if only to be a "fly on the wall" to see the wonder on their faces when they find it.

I love art by stealth!!

Cheers!
Joanna
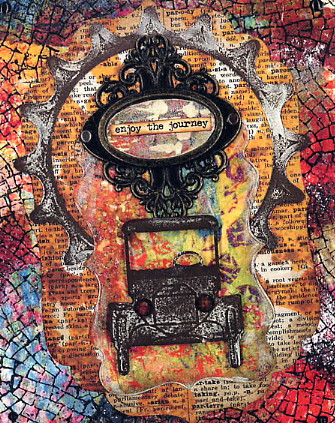


Using Humor In Art

A close second to my love of using inspirational quotes in my art work is the use of humor.  I have created a huge amount of mixed media, collage and altered art that has sarcastic and irreverent humor as its base.  It just is SO me, what can I say.

When I first started using humor in my art (in my two lines of funny magnet art), I was a little worried.  I wasn't sure anyone else had the same sense of humor that I did.  As it turned out, I had nothing to worry about at all.  Everyone loved the magnets (and greeting cards which came next) and I still sell them to this day at my art shows.  I'll do a post about some of them another time.  In the meantime, a number of other people have had great success with this type of humor, often paired with vintage images as I did.  If you've seen Anne Taintor's stuff, you'll know what mine is like.

Following are some examples of some other art pieces I created using recycled drink coasters as the substrate, along with salvaged papers, vintage images, discarded embellishments and scrap ribbon for hangers.

Hope you have a laugh!

Joanna